systems on cars were designed to operate with a max of 6-8 volts. The reason is that on points distributors the entire voltage from the coil passes through the points and too much voltage would burn them out. So a ballast resistor was put inline with the 12+ wire to the coil to limit the voltage the coil produces.
When you turn the key to start, the ballast is bypassed, and the coil gets a full 12V to put out a hotter spark for starting. Releasing the key inserts the resistor back into the circuit to preserve the life of the points. Why not design the ignition to use 12V all the time? Well, nowadays they do but before 1975 or so that's the way points ignitions were designed. This means if you buy a high performance coil and simply install it on a 240Z, the ballast resistor would limit the new coil's power output. On a points distributor you can connect a wire across the ballast to route a full 12-14v to the coil and pick up some voltage, but it can shorten the life of the points.
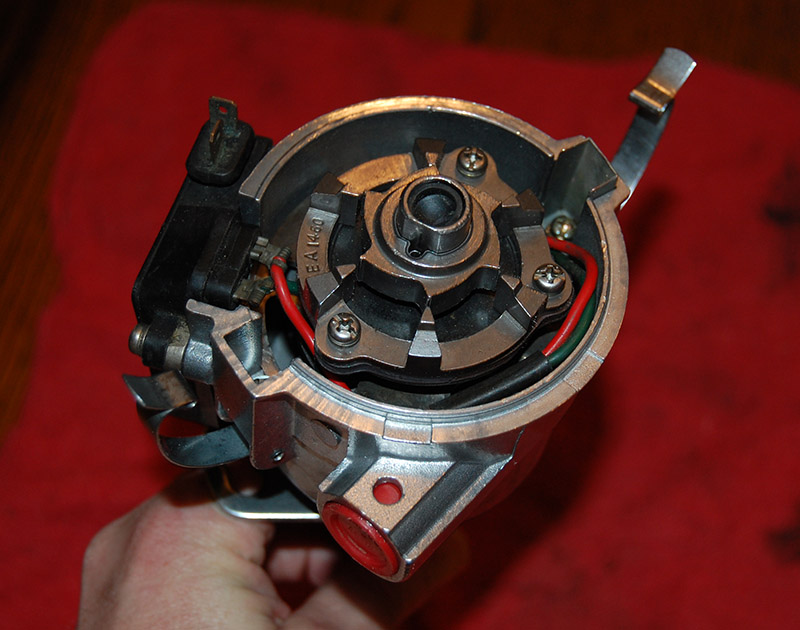
The above mod it for 280ZX electronic distributor on a 240Z. A stock 240 tach will not work with this setup because its inductive pickup isn't compatible with the signal from the E12-80. There are two solutions: Replace it with a 1975-78 280Z tach and connect the tach sensor lug to the negative terminal on the E12-80 module. If the tach jumps around, solder a 7500-10,000 ohm resistor inline with the sensor wire to reduce the signal voltage. If it still won't work simply buy a Autometer #3990 black face tach.
If you have a MSD type igniton DON'T hookup the E12-80 or tach directly to the coil. The 450 volts can fry it. Follow the ignition's hookup guide.
Unfortunately, after 40 years dashpots have seen better days: leaking and causing poor or no advance. Test yours by sucking hard on the hose going into the dashpot. With the distributor cap off watch the vacuum arm pull in. If you "hold" the pressure the arm should stay fully retracted. If it slowly leaks down the vacuum dashpot is leaking and it should be replaced (it can't be fixed). If it's leaking so much you can hear your breath hissing then you have been leaking air back into the intake manifold which is not good. To fix the leak temporarily plug the dashpot hose end going INTO the manifold until you can find a replacement.
One mistake people make is bumping the static (idle) timing up to push the mechanical advance closer to 34-36 degrees BTDC which is considered the region for performance. You have to be careful because if you have the idle timing bumped up too far, when the vacuum advance kicks in at part throttle it can throw the max timing way into the 40s: heavy pinging and damage to the rings can result. Another problem is that after 30 years the advance springs may be stretched or the weights gummed up. So you may not be getting full advance, or it may be coming in too early.
1983 280ZX with breaker plate modified to full mechanical. Advance is all-in at 1500rpm
EIGHTH - THE ALTERNATOR
CURRENT is the amount of voltage 'draw' that your electrical system pulls from the battery or alternator. Every electrical item from your gauges, to dashlights, to the ignition, draws this current rated in amperes (amps). The manufacturer simply adds up the total amperage that electrical items in the car use and installs an alternator with enough current to supply everything. If everything in the car draws 30 amps total, you would likely get a 40 amp alternator.
In the early 1970's a stock 240Z only needed an AM radio, points ignition, and basic lights and was given a tiny 40 amp alternator. But today you add an MSD type ignition, a big car stereo amp and flamethrower headlights and you easily pull much more current than the stock alternator can supply.
I realized I needed an upgrade on my 240 when my ammeter needle would jitter at idle. Even more obvious was that at night my dash lights would dim when I neared redline. After spending hours checking grounds and cleaning connectors I finally decided to get rid of my vintage alternator. I took the factory route and used a Nissan 1981-'83 non turbo 280ZX alternator which is a 60 amp version.
ALTERNATOR MOD FOR 240Zs
Buy a new "1981-83 Nissan 280ZX non-turbo" alternator at the auto store. Before you start, fabricate two little wire "jumpers" (cut a wire about 3 inches long, strip the ends, and solder/crimp a male spade on each end. NOTE: the dash ammeter will not work after this upgrade. The solution is to replace the ammeter with a 280Z gauge that shows volts or an aftermarket gauge.
- Unplug and remove the voltage regulator on the right firewall.
- On the regulator's rectangular connector coming from the wiring harness. Plug in a jumper to bridge the white wire and the yellow wire. It may appear that both wires are yellow (due to age). Luckily there are only two solid light-colored wires: these will be the white and yellow.
- Plug the 2nd jumper between the black w/ white stripe, and the white w/ black stripe wire. Leave the other holes alone.
- Reconnect the thick white/red stripe wire (Battery) to its spot on the alternator.
- Reconnect the thick black wire (ground) to its spot (Earth) on the alternator. The "P" connector on the new alternator isn't used.
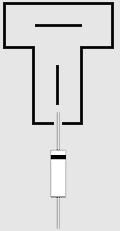
- IMPORTANT STEP:Get a "1N5402" diode. This needs to be soldered inline with one of the wires on the plastic T connector that goes to the back of the alternator. If this step is missed, the engine won't turn off with the key(!) Make sure the "line" on the end of the diode faces the connector. Don't solder directly to the connector just solder it inline with that wire of course. Diodes are sensitive to heat so be careful not to overheat the leads when soldering.
COMMENTS: On startup I found my exhaust note smoother at idle and idle is rock solid. On the road the engine feels smoother with none of the hiccups I was getting when lugging the engine to low revs or accelerating in too low a gear. Revving past redline is more smooth and solid with a bulletproof feel. My dash lights are brighter and wipers are faster. I measured 14.58 volts at the battery: just what it should be. I'm not saying this makes the car faster, but it's more driveable now without the voltage sagging at idle and redline like before. This is probably the easiest and most worthwhile of all the 240Z mods. I would save your old 240 alternator/regulator for an emergency, or to swap back to stock someday.
MSD STYLE IGNITIONS
There are several companies battling out on who has the best ignition. Most use the same concept: provide a multiple spark out to 3,000 and then revert to a single hot spark to redline. I'm currently using an MSD 6A on my carbureted F54 triggered by a E12-80 on a ZX distributor.
PERTRONIX
I haven't used a Pertronix setup but a friend has one on his '71. It seems to work perfectly and I'm impressed at it's simplicity and quality. A great option if you can't locate a L28 electronic distributor, it uses an optical pickup to replace the factory points. I would still pair it with a MSD ignition to boost the spark. Make sure to lube up your breaker plate and check the operation of the vacuum advance weights and dashpot while you're in there.
CHEVY HEI MOD
Using a GM HEI module is a 50 year old way to use a 1975-78 280Z distributor on a 240. The problem is that the GM HEI was designed for the low redline of a V8 and is well-known for it's poor spark saturation abilities above 4,500rpm, even Chevy people hated them.
I don't recommend it. Years ago I used a 1977 280Z distributor and HEI on a SU carb L28 I had built. It pinged easily for some reason and I was never sure exactly why. As a test I converted to a 280ZX distributor with a E12-80 which solved the problem. The E12-80 sells for $200, the HEI module for $20, you be the judge.
MSD PERFORMANCE TESTS
I spent some time on the interstate with a stopwatch doing 60-80 and 70-90 runs in the top three gears, comparing a E12-80 firing a MSD 6A, and a E12-80 module by itself. The times were within a tick of each other, back and forth. Kind of inconclusive. The MSD ignition gives smoother idle, needs less choke, drives better when cold, and cuts down on my exhaust smell at idle.

COIL CONCEPTS
A coil is just a transformer that steps up 12 volts to several thousand. Its positive terminal gets a constant 12 volts to power it on and a pulse to the negative terminal causes the secondary windings to produce a large spark out of the center tower. This is the common setup for the last 100 years. A capacitive discharge ignition like the MSD sends 450+ volts to the coil (instead of 12V). This is why a better ignition produces such a mammoth spark out of the coil.
- True racing coils have very low resistance "primaries" (primary windings) which draw a large amount of current. This is why real racing coils are advertised to only run with a companion racing ignition: if you run one from a stock ignition the coil can draw too much current from the ignition and damage it.
- Rracing coils run hot and can burn out after "extended periods of use". This means that normal street driving is hard on them since they are designed for short track races and dragstrip runs.
- There are many performance coils sold but some haven't kept pace with technology. The online catalogs still show several generic oil-filled "performance" coils. Some of the designs date to the 1970s and were designed for stock engines or cars with points, not 10,000 rpm racing ignitions.
- Coil manufacturers DO publish primary/secondary resistance, output voltage, spark duration/current, but they don't tell you how to interpret them.
Coil manufacturers advertise performance versions as having a "hotter spark" or "45,000 volts" but say little about what that means or how it affects performance. They say even less about how to choose a coil for different engines and driving styles. For some reason coils are marketed towards the drag and circle track racers while ignoring the classic/autocross/rally market which I find puzzling. I wondered:
Is it OK to use a racing coil on the street? What happens if you use the wrong coil with a racing ignition? Which is more important: higher spark duration or current? So I posed these questions on a respected manufacturer's ignition forum hoping to receive some wisdom. Their response was "Our xxx model should fit your car just fine". Gee thanks.
If I were a manufacturer I would remove the hocus-pocus and plainly state which measurements affect real world performance and horsepower. Has a racing or hot rod show ever tested different racing coils on the same engine to see if there's a difference?
I have used the MSD Blaster-2 (.73 ohms), Crane PS-91(.43) and PS-92 (.20). I like the MSD Blaster 2 but also the simplicity of the E-core designs. I am currently using an Accel 14009 (.70) seen above.
SPARKPLUGS
NKG plugs are the best I've used in a Z engine. Smooth, predictable and long lasting. Bosch plugs are fine on German ignitions but some consider them less than satisfactory on Z motors. There's a big markup on "platinum" plugs too. Companies know that people think products with "gold, platinum, silver, diamond" in the name are better. Centuries-old marketing, heh. My favorite is a Z with electronic ignition is the NKG BPR6ES-11. A decade ago Grassroot Motorsport magazine also recommended the NGK ZFR6F-11 sparkplug for Z engines. It's a "V-Power" plug with a projected tip which extends out into the center of the chamber simulating advancing the timing slightly by firing the mixture faster. Projected tips provide a more complete burn through the rev range, creating "free horsepower" and improving throttle response. Be careful using extended tip plugs in a shaved head or you might touch the piston(!) Be wary using multi-electrode plugs, especially on high compression motors. I spoke to a NGK tech once who said that the nooks and crannies on multi plugs can create lots of little hotspots and contribute to pinging. He said that multis are mainly designed for the modern hemi-style chambers on Hondas where the mixture is quenched in from all directions.
My 2 CENTS: Don't waste your time on plugs that use hocus-pocus: use the plugs the factory chose. If you want to increase spark performance spend your money on upgrading the ignition system instead.
PERFORMANCE PLUG GAP
The proper gap on a high performance engine is another question that the ignition companies won't answer completely. To be fair, there are a lot of engines and driving conditions to take into account. But as a general rule on a stock engine you can't open the plug gap much more than recommended by the factory because the stock coil will produce a weaker spark. However, if you are running an aftermarket MSD type racing ignition they are designed to produce a very powerful spark and can "take advantage" of a wider plug gap. What does this mean? It means you can widen the gap by about .003-.005 from stock because the ignition can still produce a strong spark across the wider gap. This longer duration spark is said to give more complete combustion and maybe more power. Drag Racing lore is to open the plug gap to .050 (or wider). But on high compression motors today's wisdom is to keep it at about .045, because as compression goes up such as on turbo and supercharged motors it's harder for the spark kernel to start. If you open a plug too wide the extra resistance at the plug electrode can actually cause arcing in the distributor cap and supposedly even from the plug electrode to the piston top in some cases(!) The stock 280Z/ZX gap is .038-.043 so on my carbureted L28 with 280ZX distributor and MSD 6A I have experimented with .045 and .050 plug gaps. Using .045 feels very correct to me and the engine has a very predictable and satisfying feel. Opening it up to .050 makes acceleration feel smoother and somehow different, kind of hard to explain. I don't have a good reason but my gut likes .045 better, it just feels better to me somehow.
PLUG WIRES
I really like 8mm Magnecor competition wires. Very high quality blue silicone, they are "real" competition wires and put the other designs I've seen to shame. Grassroots Motorsports Magazine did a test and found that these wires added 1.5hp to a stock BMW motor(!) But despite what people think, performance wires don't actually "increase" horsepower. They simply work transparently to allow the coil's full output to reach the plugs consistently. These certainly do with very clean output all the way past redline, they even smoothed out my idle. Nice.
DIELECTRIC GREASE
Dielectric (d-lktrk) noun. A nonconductor of electricity, especially a substance with electrical conductivity of less than a millionth (10-6) of a siemens.
Dielectric grease does not conduct electricity. It's purpose is to protect the surfaces of metal conductors from corrosion, sealing spark plug boots to keep water from getting in, as well as preventing arcing. Putting it on metal connections like distributor cap terminals, rotor tips, or injector contacts can disrupt signal transfer. Personally I think the companies deliberately call it "Tune-up grease" so people will slather it on at tune-up time thinking it's some sort of contact enhancer. To clean old connectors I like to use a quality contact cleaner/solvent to blast them clean, then use an exacto knife to scrape any oxidation off. Standard brake cleaner spray is a good solvent but on electrical connections you want to leave a thin film of protectant on the metal to keep it from re-oxidizing. Years ago the high-end magazine "AUDIO" recommended WD40 as a high quality lubricating oil for cleaning and lubricating the volume controls on high-end preamps. So I use WD40 to protect connections. Places to clean are the voltage regulator connections, wiper motor plug, injection brain connector and injectors. Inspect the little ground connector that screws into the lower shock tower just below the battery on 240s.
NINTH - THE CAMSHAFT
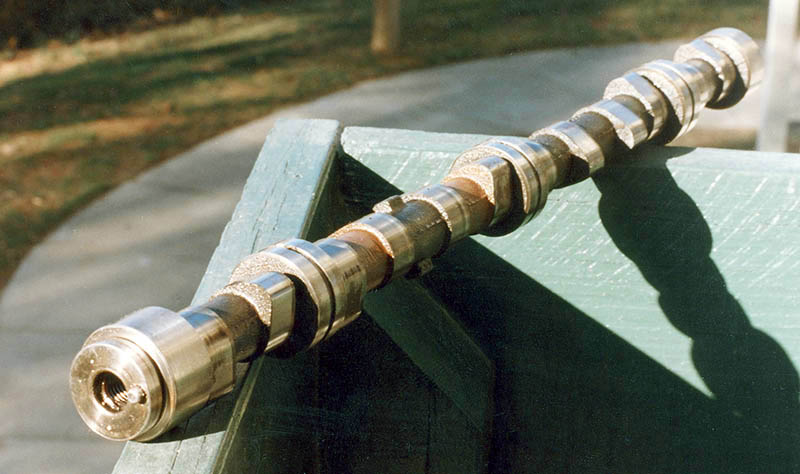
A race cam by itself won't add 50 horsepower to a Z engine. But by properly choosing one that takes into account your engine compression, fuel supply, and driving style it can enhance the power and characteristics of the motor. It's very difficult to resist buying a stage hotter than you need, especially if you want to make your car sound like a BRE racer. But the reason you shouldn't go too hot is that adding a race cam to a STOCK engine reduces power. It drops the cylinder pressure and moves the remaining power range too high for street use meaning the car will feel slower down low. ANECDOTE: I knew a guy with a 5.0 Mustang who installed a very hot cam in his street car. The car accelerated like the handbrake was on until he got to 4,000rpm and finally started pulling harder. He was convinced the car was very fast but the engine response was all wrong. So choose carefully. Think of a cam as a tone control rather than a volume knob.
Duration is the amount of time the lobe holds the valve open. Hence, a large duration cam lets lots of air/fuel in and out at high revs but can lose bottom-end torque. On the other hand a small duration cam adds power and torque at low revs by keeping air velocity high, but limits power at the high-end. Cams are typically sold as "Stage 1,2,3, etc" with each stage usually increasing the duration by 10 degrees, moving the power up the band by about 500rpm each time. Always compare cams using the @.050 figure instead of the "Advertised" duration.
Unless a cam is marketed as being ground on a new billet you should assume that it has been remachined (reground) from a stock cam. A regrind is perfectly fine but the smaller lobe base circles will require thicker lash pads be used. Thicker lash pads require you spend extra care measuring the rocker arm geometry to get the wipe patterns correct.
CAM RULES
- BIGGER OR SMALLER? if you have trouble deciding between 2 grinds, choose the milder one.
- DRIVABILITY: Choose the grind for the MAJORITY of your driving, not the occasional autocross.
- LIFT: the max on stock Z-springs is .460", higher and the springs bind. Different tension ones must be used.
- DURATION: Every 10 degree jump in duration raises the power band by 500 rpm. Don't use over about 280 advertised degrees (240@.050) unless the engine compression is above 10:1.
- POWER: a hot cam adds 10-15% horsepower. Raising duration more doesn't add more power unless compression, fuel, and airflow are all increased too.
- INJECTION: Since a hot cam changes the fuel and air flow of the motor you may need to recalibrate the brain and airbox.
My feeling is that about 270 advertised degrees (230@.050") of duration is right for street/autocross situations. Datsun race cams from the 1970's would run durations over 300 but those are intended for constant high rpm driving in race prepared motors, not normal street driving.
SINGLE PATTERN vs DUAL PATTERN CAMS
Dual pattern is when the duration is differnt between intake/exhaust lobe (example: 260/270). The concept behind a dual-pattern cam is if the exhaust valve has a larger duration than the intake it will breathe better into a restrictive exhaust system and produce more torque. If you use a freeflow exhaust system the effect of a dual profile isn't said to be as important. Performance turbo cams on the other hand can be just the opposite because of the different characteristics of the exhaust flow. As an example one turbo cam I've seen is 270/262 which appears "backwards" but is correct. I've used two dual duration Datsun Z cams: Crane Stage 1: 262/272 (222/232@.050) and Stage 2: 272/282 (232/242@.050). Stage 1 had better torque than the stage 2 which lost a bit of "snap" down low. Crane stopped making Z cams in 2005 and in 2010 their website read: S&S Cycle of Viola, Wisconsin acquired certain assets of Crane Cams, Inc. on May 7, 2009. Those assets include the inventory, intellectual property, and trademarks for all Crane automotive and motorcycle electronic and valve train products. The intellectual property portion includes designs, drawings, and cam profiles.
CWC BILLETS
Stock factory Datsun cams are stamped "Japan" and are made of some very tough metal, lasting 200,000+ miles with no problems. But blank Datsun cam billets have been unavailable in the Nissan Motorsports catalog for over 20 years. CWC Textron out of Michigan is listed as the "industry leader in ductile iron cams for passenger car and light truck applications" and used to make blanks. As of 2017 I have heard that CWC has stopped making the billets.
CAM BRANDS
Crane Cams used to make some great L-series performance cams. They were unique in that the lobe base-circle dimensions were identical to the stock cam. And with .450 lift they were simple drop-ins that could use stock lash pads and springs. All you needed were new rocker arms...perfect. In 1996 I bought a 262/272 duration cam (#168-0010) directly from Crane for $118, and a 272/282 (#168-0012) for $202 in 2000. But by 2003 they decided Z cams were "special grinds" and the prices went up to $300ea. Finally, in May 2005, Crane told me via email that they could no longer obtain the blank steel cam billets from Nissan and were dropping ZCAR cams from their catalog after many years of production.
Webcamshafts of Riverside, California has 50 years experience with creating custom and antique engine grinds as well as a couple of decades of producing Zcar cams. A decade ago they used CWC billets for their new Z cams and also had regrinds. They "Nitride" them which involves heating them to 900 degrees and in an ammonia gas chamber. Nitriding creates a super hard lobe surface and is considered to increase the life of a cam 10-fold. I resisted the temptation to go with their stage 2 cam the "# 91" which has 238/238@.050 duration. Instead I ordered their new billet "# 94a" with .430 lift, 230/230@.050" duration which used stock base circles. I installed it in my P90 head in mid October 2005 and found the wipe patterns on the rocker arms were perfect. Despite its moderate specs on paper, the 94a isn't a baby cam. The exhaust note is deeper than stock with a nice cam burble. Acceleration is strong and linear down low and when you tach it out the acceleration is strong and it pulls hard all the way to 6800rpm. It doesn't have that "dead below 3k" feeling of some higher duration cams and is surprisingly torquey. I would pair it with a higher ratio rear end like the factory 3.90 to really enhance bottom end torque.
SPRINGS AND VALVE FLOAT
Valve float is when the valve spring can't control the valve at high revs and the valve flutters on the seat. This makes the engine misfire and lose power of course. It became an issue years ago when American V8 engines came with poor valve springs from the factory and would float the valves at ridiculously low revs. So drag racers started installing heavy valve springs to try and control the valvetrain. I've never heard of or experienced valve float on any Z motor with stock springs, they were that good from the factory. The valve springs were identical from 1970-83 and a properly tuned 2.8 liter motor can easily rev above 7,000. The redline on a 240Z is 7,000, the 280Z is 6,400. The redline differences between motors were because of the engines displacement.
ROCKER ARMS
When replacing the cam you should always replace the rocker arms. Even though the arms' surfaces might look smooth they have a subtle wear pattern that's mated to it's respective lobe. This mating takes place in the first few minutes of new cam/engine startup. If you use old arms with a new cam the subtle wear pattern in the pad surface can wear into the cam lobes and damage them. This probably the most misunderstood part on a Z motor, unfortunately one of the more expensive parts too.
NINTH - THE OIl
The quality of the oils used in the 1970's-80's was terrible compared to today. The old oils sludged up, burned, and turned to varnish over time. That's why the "in-thing" back then was to change your oil every 2,500 miles, otherwise it dirtied up the motor.
Well, motor oils in the past decades have come a LONG way. The secret of oil quality has to do with the API rating. The first letter (S) means the oil is rated for a gasoline engine. The higher the second letter, the higher the levels of detergent, varnish inhibitors, viscosity improvers in the oil. The old ratings from the 1970's (SA, SB, SC, SD) are obsolete, while today the current rating is SQ. That's why today an engine with 50,000 miles will be nearly clean inside, while motors from the '70s have a brown film baked on everything. So changing your oil every couple of months isn't as critical as it used to be. The filter catches the dirt the same as it's always done but the oil maintains it's slipperiness (viscosity) for well beyond 5,000+ miles. The Lube shops are having problems as a result. They still tell people to change oil every 3,000, while new cars manufacturers are saying 5-10,000.
MULTIWEIGHTS
Despite what your old manual says don't use 10W-40, no new engine today uses it. Instead, use 10W-30. Because it's lighter, it will free up a couple of horsepower, rev faster, and will reach all bearing surfaces more quickly. 5W-30 and 0W-30 are too thin for Z motors. And don't use 20W-50, that stuff is like molasses and is meant for motors with large bearing clearances like older VWs.
ZDDP
Older engines with mechanical valve tappets like the ZCar L-series engines and V8s with flat tappets (not roller cams) were designed for motor oil which contains a moderate amount of zinc and phosphorus known as ZDDP (zinc diaklydithiophosphate). ZDDP is considered a miracle lubricant for engines and has been used for about 70 years in motor oil and greases worldwide. Modern engines weren't designed to need ZDDP so the modern-day automotive world doesn't even speak of it. But for vintage car and hot-rod owners the diminishing levels ZDDP in oil is a real issue because it's required to lubricate the cam lobes and prevent wear across the rocker arm surfaces.
WHY IT'S VANISHING IN OIL
While zinc is not directly harmful to the environment, if its burned due to ring blowby it ruins your catalytic converter. So over last decade the EPA has pressured the oil companies to reduce the percentage of ZDDP in their passenger car oils. This extends the life of converters...which in turn reduces total car emissions. The construction industry claimed their heavy equipment required ZDDP so diesel oils like Rotella T made by Shell were made with higher levels. However, I don't like the idea of using bulldozer oil in my 7,000 rpm L28, even if it does have more zinc. Starting in 2007 construction equipment began receiving tighter emissions standards so today zinc in Rotella is likely as low as standard car oil.
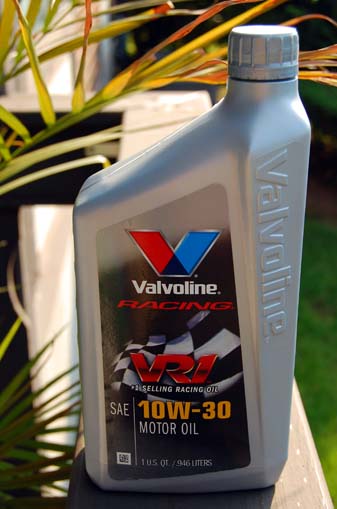
Luckily there is still one company with the that markets a higher ZDDP oil for passenger cars, in a viscosity that doesn't reduce horsepower: Valvoline. Their VR1 10W-30 racing oil is a quality SL grade oil which simply means the ZDDP hasn't been removed to qualify as a SL or SM grade. Valvoline's MSDS sheet lists it at 1.3% phosphorus/zinc, 1% sulfated ash and 2.5% calcium which makes for a nice lube cocktail. Mobil 1 is available in a high ZDDP synthetic but I find it too expensive for my tastes.
OIL FILTERS
Oil filters don't increase horsepower or make the engine breathe better: they filter the oil. The particle size considered to cause the most wear is said to be around 15-25 microns in diameter. What is needed is a filter which can reliably filter the smallest particle size from your oil supply. Be careful using racing oil filters as many are designed for maximum flow by allowing everything up to 50 microns or so to pass into the engine..
I remember in the 2000s Consumer Reports magazine named FRAM the best on the market and I have used them since 1980 with no problems. They have received bad press online for some reason which I think is unfounded.
WIX filters are high quality and filter down to 19 microns. Their advertising is aimed at people who understand engines. The filter they list for 1970-83 Z car engines is #51521.
NAPA makes a high-quality filter with part #1521 which filters down to 19 microns. Interestingly, the specs between WIX and NAPA are identical and it appears they may be the same filter. Between the identically spec'd pair I use the NAPA because it's easier to find. The NAPA name may conjure up thoughts of truck parts, but isn't that what you want... a quality filter designed for long service duty?

OIL PUMPS
Nissan modified the L-series oil pump for the 1981-83 Turbo 280ZX to put out more volume than standard Z oil pumps. Labeled “H4” on the side it has a longer rotor/stator inside the body so each rotation puts out more CC of oil. Non-turbo pumps are stamped with H28, H33.
Years ago I was told that the pump for the automatic transmission 280ZX turbo had a higher CC volume per rotation than the manual trans turbo pump. Supposedly this was to provide more oil for the oil cooler which only came on the auto trans model. To back this up Nissan lists two part numbers for the turbo oil pumps: 15010-S8000 for the auto and the more expensive 15010-V0300 for the manual trans model. However, people (me included) have taken apart the pumps and both the auto and manual versions appear to be identical with 40mm long stators and the same pressure spring.
So the mystery continues…why did Nissan provide two different turbo pumps if they appear to be the same internally? In any case upgrading to a turbo oil pump will energize the oil supply and raise the pressure to the rear bearings. But be careful…since turbo/non-turbo pumps are identical externally the auto store might sell you wrong aftermarket one…the only way to know what it is for sure is to open it up and measure the length of the shaft.
I would buy a turbo pump from Nissan, Black Dragon or Motorsport Auto to guarantee you get a real one.
TENTH- AIR FILTERS
Whatever version filter fits your setup and makes you comfotable is preferable. Not much to say here.
ELEVENTH- EXHAUST SYSTEM
STOCK MANIFOLD
The stock Z exhaust manifold actually flows well for street use. Durable and Quiet.
HEADERS
While some people claim a header produces no effect, putting one on a motorcycle requires that you actually rejet the carburetors because it improves breathing so much. In addition, car legend is that the Corvette 427 L88 motor would pick up 150hp just by adding tuned headers. While I admit that a Z engine in stock form wouldn't benefit much from a header I feel a L28 with a bigger cam, higher compression and ported head demands one. If you create a free-breathing motor that pulls 7,000rpm, putting a stock 2" exhaust on it doesn't make sense. Every road-race car in the world uses headers. Good enough for me.
A header uses long exhaust runners to separate the exhaust ports and allow better top-end breathing (scavanging). This occurs because having long exhaust runners keeps each exhaust pulse from interfering with the gases exiting from the head. An interesting benefit of a header is that gas mileage usually goes up. The standard improvement advertised by header companies on motors is advertised at 5-15hp.
Headers are made of thin-gauge steel because they have to be bent into shape and welded rather than cast like the stock manifold. The result is that they tend to rust through quickly. The solution is to get one with Jet-Hot or ceramic coating to lower heat and improve durability. The paint they are shipped with usually flakes off so on new headers I use paint stripper to remove the factory paint and recoat with a quality manifold heat paint. I used the Motorsport Auto 6-2 header for about 10 years and had no problems with it. In May 2007 I replaced it with a 6-1 version and their premium bolt-on 2 1/2" system. The header has a thick flange with good clean welds inside the header. The exhaust system exceeded my expectations, with high quality 3-bolt flanges both the in front and rear joints, the exhaust hangers were even welded in place. Good job Motorsport!
The MSA header gasket uses a metallic core which is very similar to the Fel-Pro version. I had no problem using this gasket which appears very durable. Despite the warning that stock gaskets leak with headers, mine sealed tight as a drum. I suspect the warning against stock gaskets is an old wives-tale from American hot-rod days. TIP: use a fine flat file across all the ports on the header flange before installation to take off high spots and make it flush. I believe this is actually where leaks come from.
People have been arguing about whether to use a 2 1/4 or 2 1/2 " pipe for years. If you are doing competition then a 2 1/2" pipe will add a couple of horsepower on the top end, but a 2 1/4" works and fits well for the street. Just don't lose sleep over which is best. NOTE: if you have a catalytic converter, you can only 'legally' change the "cat-back" part of the system. Keep in mind that the Monza and Ansa brand systems are only 2" in diameter (boo). Also, the 240Z came stock with a teeny 2" exhaust pipe stock. Kudos if yours is still intact, but I would replace it with a larger diameter pipe. One tip to make the 2 1/2" pipe fit better if you have a R200 is to use an angle grinder to take down the left lower edge of the R200 where the pipe touches it. Invisible if done properly
HEADERS vs HEAD TYPE
All intake ports from 1969 to 1983 were round, the L28 heads have a small notch at the top for the injector. Use a 1970-73 intake/exhaust gasket to cover these if you want to use carbs on an injection head.
- 1970 through 1976 heads have square exhaust ports (E31, E88, N42)
- 1977-83 heads use rounder, diamond shaped exhaust ports (N47, P79)
- 1981-83 turbo heads have square exhaust ports (P90,P90a)
MUFFLERS
The search for the best muffler is as long as the one for the Holy Grail. Everyone has their favorite. Here are my experiences and the ones I've tried.
- DUAL ANSA TIP:I used dual Ansa tips on my 1976 280Z in the 1980s. Good idle tone but raspy under power. Thin wall 2" pipe.
- MONZA BIG BORE SINGLE TIP:I used one of these single tips on a straight pipe on my 1976 280. Sounded incredible when opened up and the Virginia State Police actually gave me a ticket for a noise violation.
- SUPERTRAPP 4": I used one of these for about 8 years. Great for tuning the sound using the removable plates. No negatives other than having to keep an allen wrench handy for the screws.
- DYNOMAX super turbo-oval 2 1/2": nice refined tone which made the car much quieter, excellent performance. Doesn't fit well under the rear valance though.
- MAGNAFLOW 2 1/2" XL turbo: My current muffler seen below. Fits perfectly and looks stock. Around town has a nice sedate rumble but when opened up above 4k it sounds like a machine gun on 110 octane. The welds have an odd brown tint that isn't rust, I would have it Jet-Hot coated if I were to do it again.

The result is a stock-looking 240Z with larger displacement motor, superior electrical system and ignition, 5-speed, upgraded drivetrain AND a high-ratio rear end. A good old fashioned hot-rod using factory parts! Thank you Nissan for making all the parts interchangeable!